Create new destination
Users who have editing privileges can create new destinations. Do the following:- Click the Create new button.
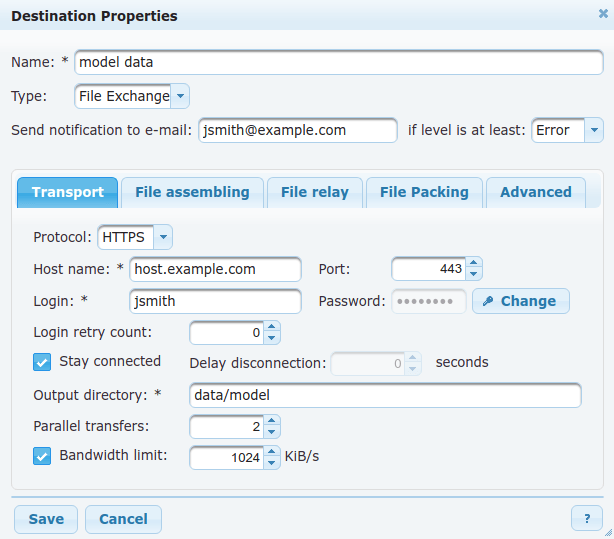
- The Destination Properties dialog will open.
- Specify the basic properties:
- Destination name: Enter a destination name which contains maximum 80 characters.
- Type: At the moment, only File Exchange is supported.
- Notification e-mail: It is possible to request e-mail notification of log entries related to the destination. In the Notification e-mail input text one or more e-mail addresses can be entered separated by comma. Notification level combo box allows selection of minimal severity. If
Infoseverity is chosen all destination related log entries will be delivered to the specified e-mail address(es). IfWarninglevel is chosen, messages with Info level won't be send to the e-mail address(es).
- Specify the properties on the tabs:
- Transport tab:
Protocol: Select the protocol type. The following types are supported: SFTP, FTP, SCP, HTTP, HTTPS, Local or E-mail. The other specifications on this tab depend on the selected protocol.
FTP, FTPS, SFTP, SCP, HTTP, HTTPS: Common settings- Host name and Port: the name or IP address and the port number of the intended host, e.g.
myftphost.de - Output directory: the path to the upload directory on the FTP host, e.g.
incoming/myftpdirectory - Login: the name of a valid FTP account on the given FTP host, e.g.
myftpuser - Password: the password of the given FTP account
- Login retry count: Specify the maximum allowed number of repeats in case of unsuccessful login. This is useful in cases if the destination server blocks access after a certain number of unsuccessful logins. For example, if the destination gets blocked after 3 unsuccessful logins, specify this number as
1or2. - Stay connected checkbox:
- if unchecked: Disconnected after the products are sent.
- if checked: Keep the connection open permanently.
- Delay disconnection spin-box: if "Stay connected" is unchecked In case that connection is terminated after the product is sent, specify how long after sending the product the connection should be terminated. This is useful in case that the products are sent often: for example if a product is sent each 5 seconds and you want to avoid constant connections and disconnections, specify a longer delay.
- Output directory: Specify the directory where the products should be stored on the destination server.
- Tmp. file name format text-box: Enter the name format for the temporary file name that should be used for storing the file during transfer. By default, the original file name is preceded by a dot "." The file name can include regular characters and format identifiers (preceded by %). See section File name formats for description of format identifiers.
- Parallel transfers spin-box: Used for simultaneous transfer of a large number of products. Specify the number of allowed parallel transfer connections.
- Bandwidth limit...kB/s checkbox and spin-box: Select if you want to control data transfer speed towards the destination. The limit is total amount of data per second sent by all Parallel transfers . Though, the data volume is counted at application level; protocol specific overhead is not considered.
- Silently overwrite existing remote files checkbox: This checkbox enables to specify the file transfer behavior in case that the file which is being transferred has the same name as a file already stored in the destination directory in case that the server does not enable the rewriting of old files.
- if unchecked: a warning log is generated: "Cannot rename temporary file to final name", "Connection lost while uploading file", or "Failed uploading the file", depending on the settings of the remote server. After the first failed trial, the old conflicting file is removed from the destination directory, and the new file is uploaded.
- if checked: the conflicting file is removed immediately and no warning is logged.
FTP, FTPS: Specific setting
In addition to the above properties also the following can be specified:- Mode list-box: Select the transfer mode. The following modes are available:
- active: The connection is established in both directions, i.e. the client connects to the server and requests data and the server connects to the client to provide the data.
- passive: The connection is established in one direction, i.e. the client connects to the server and requests data. The server informs him about a port to which the client should connect. This mode is used for clients that have restrictive firewalls which disables the connection from external servers.
- Use IPv6 extensions check-box: Only relevant if server is accessed via IPv6/IPv4 protocol. Usually check, leave unchecked in case of firewall issues. Enables special FTP commands such as EPRT and EPSV which are required for IPv6 networks. Most FTP servers can use it in IPv4 too, but some firewalls are known to have problems with it.
SFTP, SCPS: specific setting
File transfer protocols based on the Secure Shell (SSH) protocol can use two types of user authentication, therefore the following can be specified in addition to the above properties:Authentication method list-box: Two types of user authentication can be used in SSH - by a password or by a public-private key pair that is commonly referred to as identity. The following methods are available:
password
User will be authenticated by Login and Password
default identity
Authentication is based on a public-private key pair; the path to the default identity file and optional password that protects it is specified in the Moving Weather software; in the configuration of the Global Parameters.
E-mail
Subject: Enter the text that should appear in the Subject: of the e-mails. he e-mail subject can contain common specifiers (mostly date and time elements) known from the file name creation and the specifiers that refer to the file name itself (typically
%FN).- Originator: Enter the e-mail address that should be used as the e-mail of file sender. this is the default e-mail address of the Discover Weather system.
- Recipents: Enter the e-mail address of the intended recipient of products sent via this destination and click
 . Several addresses can be specified.
 - Do not transfer files bigger than: Specify the maximum size of a file that is allowed to be transferred in order to avoid problems at the mail server. Files larger than the given limit will be rejected by the channel itself and the incident will be logged.
- Send files directly in the e-mail body: Specify how the files should be sent in the e-mail:
- unchecked: files will be sent as an attachment
- checked: files will be sent inline, in the e-mail body. In the Text encoding select the encoding that should be used for the display of the inline files.
- Send only textual files in the e-mail body (auto-detected): Check if only text files should be sent inline, in the message body; other file types will be sent as attachments.
Local
This option is only available for administration portal users that have the privilege "Permission to manage local destinations". Only users with such privilege can create and modify destinations with local transport protocol, i.e. this option will be listed only for user that have this privilege. Other users can see such destinations but are not allowed to create or modify them.- Output directory: Enter the path to a directory on the local host where the files will be copied, e.g.
/var/modeldata.
- Host name and Port: the name or IP address and the port number of the intended host, e.g.
File assembling tab:
- File name: Enter the name format which should be used for the assembled file in case the the products are messages that are assembled to files before sending. The name can include regular characters and format identifiers (indicated by %). See section File name formats for description of format identifiers.
- If the sent products are files not messages, the original file name will remain.
- File Format list-box: Select the file format that will be allowed to be received to this destination. Allowed formats are: GRIB/BUFR, Heading Separated, One Message One file, WMO Standard 00, and WMO Standard 01. See detailed description in File formats.
- Close the file and send it when: Specify at least one condition for closing the file by checking the corresponding checkbox. It is possible to specify more conditions. The file will be closed if any of the specified conditions applies.
- Message count reaches checkbox: Specify the maximum number of messages that can be placed in one file before it is closed. If this number is set to 1, then the other options for closing conditions will be disabled (the file will be closed after one message is included in it).
- Total file size reaches checkbox: Specify the maximum number of characters allowed for one file. After the size is reached, the file will be closed.
- Collection time reaches checkbox: Specify the maximum time during which the message collection into one file will continue. Measurement starts when first message is assembled. When the given time runs out, the file will be closed.
- Message with priority ... checkbox: Specify the message priority which will trigger closing of the file. This is useful to decrease delivery delay for high priority messages.
- File name: Enter the name format which should be used for the assembled file in case the the products are messages that are assembled to files before sending. The name can include regular characters and format identifiers (indicated by %). See section File name formats for description of format identifiers.
File relay tab:
Products which are distributed as files can be renamed before being delivered. The renaming can use regular expressions or wild cards.

- Create New: Create a new output file renaming rule.
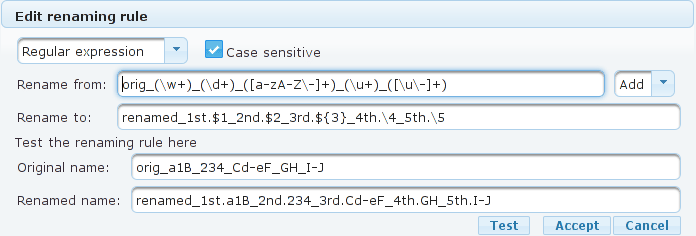
- Rename from: Enter pattern to match the original file name.
- Rename to: Enter formatting string to create the new file name. The string may include regular characters, references to sub-matches (e.g.
\1) and date/time format identifiers (indicated by %). More details on RegEx formatting strings can be found in http://www.boost.org/doc/libs/1_52_0/libs/regex/doc/html/boost_regex/format/perl_format.html; more information on date/time format identifiers can be found in section Common specifiers in File name formats.
The renaming rule can be tested directly in the dialog in the following way.- Original name: Enter the original file name to test the renaming on.
- Press ENTER or click the Test button.
- Renamed name: This box will display the result of the test renaming.
- Create New: Create a new output file renaming rule.
File Packing tab:
- Enable packing of files: Allows to pack multiple files into one TAR ball or zip archive before they are sent to the destination.
- if unchecked: No packing is done, each file is sent separately.
- if checked: Files are packed together and the pack is closed and sent only if one of the closing conditions is met (see below).
- Pack name format text-box: Enter the name format which should be used for the file pack. The pack name can include regular characters and format identifiers (indicated by %). See section File name formats for description of format identifiers.
File pack format list-box: Select the format for the packed file. The following options are available:
gz (gzip compressed file)
bz2 (bzip2 compressed file)
tar (uncompressed TAR ball)
tar.gz (gzip compressed TAR ball)
tar.bz2 (bzip2 compressed TAR ball)
zip (zip compressed file pack)
- Close file pack and send it when: Specify when one pack of files should be closed and sent. You can use a combination of several conditions - if one of the conditions is fulfilled, the pack will be closed.
- File count reaches checkbox: Specify the maximum number of files that can be packed in one pack before it is closed. If this number is set to 1, then the other options for closing conditions will be disabled (the file will be closed after one file is included in it).
- Total pack size reaches checkbox: Specify the maximum number of bytes allowed for one pack. The size is checked after each file and considers possible compression. When the size is reached (exceeded), the file will be closed.
- Collection time reaches checkbox: Specify the maximum time during which the file collection into one pack will continue. Measurement starts when first file is packed. When the given time runs out, the file will be closed.
- File with priority ... checkbox: Specify the message priority which will trigger closing of the pack. This is useful to decrease delivery delay for high priority files. The pack which has been closed due to file priority will be prioritised in the upload queue as well.
- Enable packing of files: Allows to pack multiple files into one TAR ball or zip archive before they are sent to the destination.
Advanced tab:
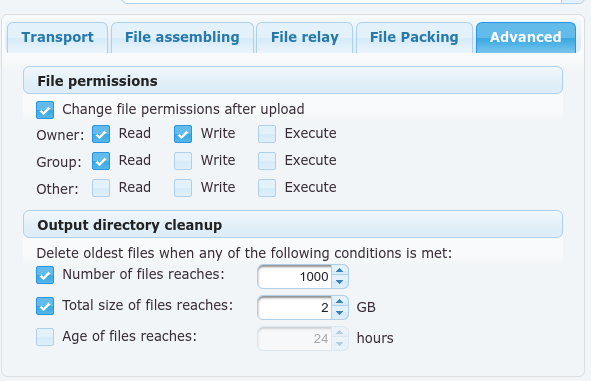
File permissions section:
Check the Change file permissions after upload check-box to enable setting up special file permissions for the uploaded files. Then use the individual check-boxes to set the permissions:- Owner: Select Read, Write & Execute file permission for the owner of the file.
- Group: Select Read, Write & Execute file permission for a user group.
- Other: Select Read, Write & Execute file permission for everyone else.
Output directory cleanup section
Specify at least one condition for deleting old files from the output directory. The clean-up will be done if any of the specified conditions occurs. This specification is used to avoid "disk full" on the destination if the remote site is not processing the files.- Number of files reaches checkbox: Specify the maximum number of files in the output directory. After the limit is reached, the oldest file will be automatically deleted.
- Total size of files reaches checkbox: Specify the maximum for the sum of file sizes. If the total file size is exceeded, the oldest files will be deleted until the total file size is below the limit again.
- Age of the files reaches checkbox: Specify the maximum age for the file. All files older than this age will be automatically deleted. As the 'age' of file is calculated from time stamp as reported by remote system the clock on both systems shall be more or less accurate. The difference caused by time zone or daylight saving time is considered automatically, though.
- Transport tab:
- Click Save. The destination will appear in the list of specified destinations.
File name formats Labels: admin-guide, ~msandev:favourite, ~srichart:favourite
File formats